 |
| Star Trails + North Star |
Well, when it's not too cloudy.
I was up till two o'clock in the morning creating this image above. Most of that time was actually spent taking the photos that create this image. I took an hours worth of photos (200 images) but I only used half as the sky clouded over for the second half. This image represents about 30 minutes worth of movement in the Earth's rotation to create these star trails.
I used all 200 (well 199, I deleted one) images that I took for the image above to create a timelapse video. This video is only 20 seconds long but represents an hours worth of night sky. Here it is:
I'm new to this type of photography, this is only my third time trying over two days. It's quite fun and addictive I must say! Though it is very time consuming.
Here is my first try at capturing star trails:
 |
| Star Trails |
 |
| Star Trails over Stroud |
How did I create these images? Well a dark, cloudless, moonless night works best, none of which I had. I locked my camera onto a tripod, set the focus on infinity and switched off the auto focus. (Your camera can't focus in the dark) With camera in Bulb mode I manually set my aperture, shutter speed and ISO settings. I did use different settings for these images, a lot depends on the amount of light etc. A good starting point is ISO 400-800, F2.8 with a 30 second shutter speed. Yes you are right, that's not going to show much movement. But when you take around 50 images (or more), one after the other, with just a little 2 second break in between to keep your sensor from over heating, and you stack these in a photo editing program then blend them together so that all the layers show through, then you can see the movement.
Technical info:
In Photoshop CC > File > Scripts > Load Files Into a Stack
Then Layers > Select all images > Change layer setting from Normal to Lighten
And VOILA! Like magic you can see the star trails.
There's one other thing I used, an app on my phone and a dongle thing from TriggerTrap used to connect my phone to my camera to control my camera and auto take the photos for me. Yea, I just left the camera to do it's thing and came back 30 minutes later to collect the results. Thank you TriggerTrap!
Another handy tool is a night sky map, of which there are several, that you can use to find things like the North Star and locate where the Milky Way is etc. I used Google Sky Map.
There's lots of other apps you can use too, for things like seeing when and where the sun and moon will rise and set and what phase the moon will be in etc, as well as what the weather forecast is. If you are smart and plan ahead these can be very useful and save you lots of time......but I can't be bothered with those, I just go outside and look up at the sky.
I joke about the British weather, but it's not always cold and wet here, we do have lovely sunny days and the most amazing sunsets and sunrises. I'm lucky to be living in the Cotswolds as well, amazing views around here and lots of lovely places to go on long walks. We are very lucky indeed. :-)
Next I try to photograph the Milky Way! I will blog about my results soon!
Oh, I almost forgot! The Stroud News and Journal (Local paper which I occasionally work for) saw my star trail images over Stroud and asked if they could put one in the paper. It's in this week's paper which came out on October 8th 2014.
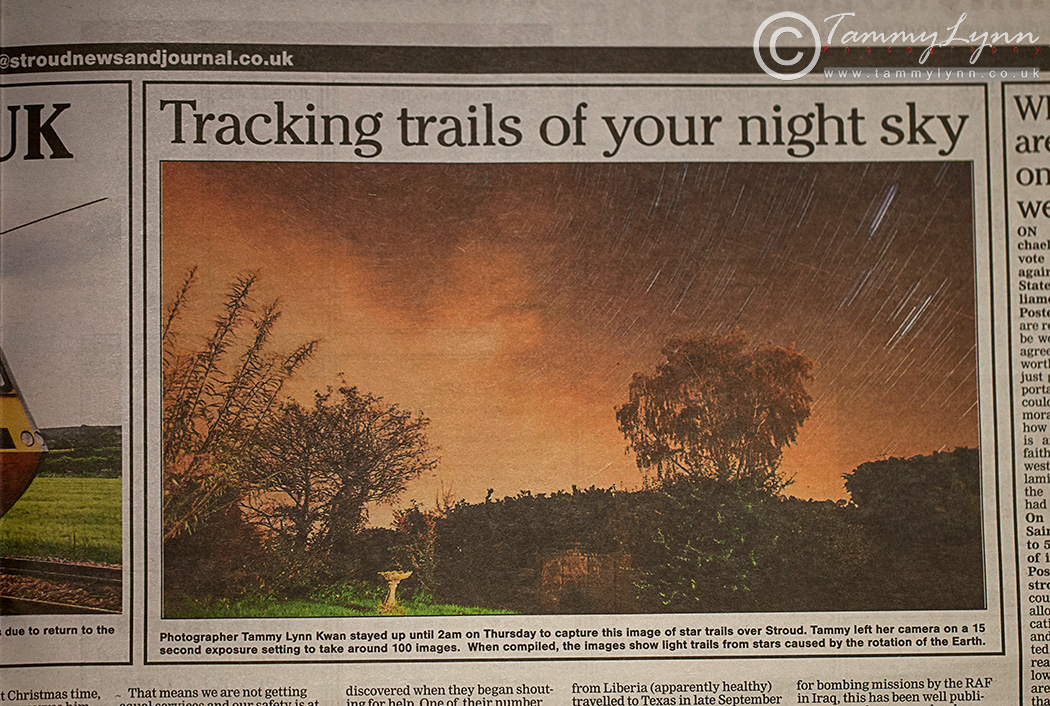 |
| My star trail photo in the local paper. |
No comments:
Post a Comment